Monday, 3 November 2008

Week Six

The early part of this week is dedicated to creating the finishing touches for the 3D Face prototype due to be handed in on Friday and picking up from where we left off with the continuation of the Young Mans Christian Association project.

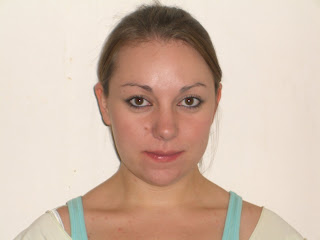
The 3D prototype portrait has developed with a relative amount of success. Clearly it is a female character with a full face, large almond shaped brown eyes, an upturned nose and a shapely mouth. Although it is not a true representation of the model it is based on, the features it defines are incredibly similar to those of the original photograph.

Hair was the final addition to the character and due to time constraints it could not be built. Instead the hair and fur tool from the 3DS Max package was used to create one hundred and fifty thousand two inch long hairs to cover the scalp with out bald patches! The hair was coloured dark brown at the tips and light brown at the ends and using the comb tool was pulled out to create a wavy, spiked ‘do which looked very eighties but allowed the viewer a glimpse of how longer, flowing hair would look upon the model.


With the finishing touches complete the assignment was ready to be handed in; snapshot images as well as the 3DS Max file were uploaded to a disc for grading by the course leader.


Previously in week three after receiving feedback from the course leader the decision was made to draw full length front and side views of each character being made for the YMCA promotional advertisement. Finally in week six this was able to be done, the sketches were recreated on A3 paper and coloured using a scheme which reflects the fun and age ranges of the projects available at the YMCA as well as those which will appeal to the target audience. Namely these are primary colours; red, yellow and blue. These sketches will be presented to Craig Gough in week seven when the group is due to meet him.

Week Five

Having almost completed the facial features in the previous week, this week the focus is to build the back of the head, create the neck and add textures such as skin, eyes and if possible, a full head of hair!


Continuing the build of the head involved drawing yet more trace lines on the original side view photograph to use as a guide. The next step was to create a sphere and align this with the face, shaping it where necessary to create a basis for the head. From here, the quad lines of the face and the traced guidelines were used to align the sphere and build back from the face and down to the neck area. As with shaping the face, each quad had to be manipulated and aligned, then the image rendered to see the effect before readjusting to create as smooth a shape as possible.

Building the neck back from the chin was definitely the most technically difficult part of the tutorial for several reasons. The main reason being it was hard to decipher which angle to create the underside of the chin and then as the build of it commenced how to shape it so that it was not full of lines and dips and creases but a smooth, realistic surface.

A lot of time was dedicated to smoothing the contours and surface of the back of the head and neck; it was incredibly difficult to get the alignment of the quads right. As a result, for the majority the head and neck areas are smooth and bump free but small patches are uneven in their texture and their shape is not a true representation of the 2D image.

Texturing the face was fairly simple a plain skin colour was used from the palette provided by 3DS Max. For the eye, two circles were drawn in Adobe Photoshop, the inner made the pupil and therefore was a glossy black colour, and the outer circle made the iris and was a hazel brown colour. This was then imported as a texture into 3DS Max, the glossiness adjusted so the eye shone and the eyes were adjusted so the pupil and iris were in the centre and round to create as true to life an appearance as possible.

Week Four

Creating a 3D face using 3DS Max is a unique experience for a novice to the programme. To solve the quad line problem of the previous week, simple changes had to be made in the settings of how the package uses and displays the photograph; basically the bitmap needed to be matched between the jpeg image and 3DS Max to allow the trace lines visibility.


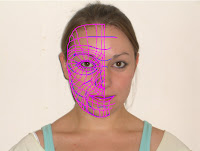
Using the line tool and using vertexes quad lines were drawn over the face to create a foundation for the work to be carried out in the next stages.


Once the quad lines were complete it was necessary to change the users view to the left side. Using the profile as a positioning guide, the quad line points were pulled to align with the contours of the forehead, eyebrow, eye socket, nose, mouth and chin. The combination of these two steps allowed for manipulation of the remaining quads to create eyes, nose, cheeks, lips and chin.


To create a smooth, shapely face without wrinkles, creases or unrealistic dips was a timely process and involved constant realignment of quads with test renders to view the effect each changed shape and line had on the overall appearance of the face.


The eye socket was built using editable polygons; the eye contours were manipulated around the eyeball and shaped to resemble the same curves of an authentic eye area.

The nose was built in much the same way; the original quads outlining the face were pulled into a nose shape similar to my own which involved pulling it up slightly at the tip of the nose and maintaining a straight strong line through the middle.

For the lips editable polygons were used once again to create the fullness and shape. Instead of being flush to the face the mouth is slightly extruded and cuts almost in half in the centre of the top lip as mine do. The bottom lip is rounded and full, and both are bright red in colour both to show off their shape and because the original photograph used to create this 3D self portrait portrays a bold red lip colour.

Monday, 20 October 2008

Virtual Environments Week Three


This week the project can be broken down into two parts; the first is the creation of a 3D face prototype and the second is taking the next steps for the YMCA assignment. Having pitched the original YMCA idea to the course leader and received positive feedback and constructive criticisms the intention is to draw full scale front, back and side views of each young male characters. The aim for doing this is so there are defined shapes and sizes to work with; a two dimensional template for the three dimensional characters. We also decided to play with textures that could be worked with in Studios Max; whether to use block colours or create such materials as denim, cotton and leather. These options will be decided later in the final stages of the project as the actual build is more important to focus on at this stage. The meeting with Craig Gough is yet to be arranged but the possibilities are for week five or six.

The second part of the project for this week is the creation of a prototype face. The preparation of which requires a front and side view photographed self portrait.

Once taken these photos had to be loaded into Adobe Photoshop and then the face must be adjusted so the features are both the same size and level between the two different views. In order to create a three dimensional face in 3D Studios Max preparation can be done to simplify the process in Photoshop. The basic idea here is to draw in the structure lines of the face, tracing the shapes and contours around the eyes, mouth, cheekbones and chin providing to scale guidelines to trace in 3DS Max. To do so, an online tutorial found at
provided step by step instructions directing where the lines need to be drawn and how to achieve the best results. Once the feature lines have been drawn on a separate layer to the photograph of the front view using a blue paintbrush a new layer must be created. Then the next step is to trace the blue feature lines and extend them to outline each shape of the face and draw in quad lines which will be used to construct the model of the face when transferred into the 3D package.


The tutorial took a matter of hours to complete to be at a standard that was high enough for this level of work. The image was imported into 3D Studios Max and this was where some teething problems were encountered. The resolution of the lines drawn in Photoshop that shown in 3Ds Max are not of a high quality and therefore the quad lines are not visible enough to be traced as intended.

Virtual Environments Week Two

Mondays lecture was replaced with an initial briefing of and visit to the Young Mans Christian Association Chelmsford. The talk was hosted by Craig Gough who informed the group of his expectations regarding the advertisement as well as key groups and event nights held at the YMCA which he wishes to promote to a wide spectrum audience.

We could not view the premises as the group was too large and therefore Daniel and I emailed Mr. Gough (
craig.gough@chelmsfordymca.co.uk) in order to arrange a meeting at a later stage to formally visit and observe the various functions of each room as well as which groups make use of the facilities.

As a starting point to meet the expectations of Mr. Gough and our brief we designed an idea cloud of various solutions to the problem. The favoured response would be to create an advert which appealed to a wide age range to incorporate the many amenities available at the YMCA. Mr. Gough mentioned he would like an animation which could be posted directly to schools to advertise the Charity and the variety of activities, groups and support they offer for all ages.

The idea cloud encouraged the idea of a first proposition to solve the problem. A grayscale home environment with two brothers; one young and energetic, the other older with the need of a creative outlet, bored at home and watching dull daytime television. The screen pans round to show the television screen which suddenly becomes colourful, bright and fun lighting the room and advertising the YMCA.
The advertisement asks its audience [the two brothers] if they are bored and invites them to join in the fun at the YMCA Chelmsford. The pair of boys are taken in by the advertisement and find themselves at the charity premises. The camera follows them as they dash excitedly from room to room [highlighting the nursery, after schools club, battle of the band, open mic night and youth sports club] before they go their separate ways to make new friends and participate in the sports club and open mic night.

The aim here is to reach a wide audience of various ages, interests and needs and therefore it is believed that two main characters with opposing interests and a fairly large age gap is the best solution. The first excited look around the YMCA allows insight into the large variety of activities, groups and support available as well as the services provided by the charity.

Monday, 29 September 2008

The Brief: Initial Thoughts Week One

The Young Mans Christian Association is a charity based in Chelmsford town centre that provides support and entertainment to children of all ages, three months right through to sixteen years old. The YMCA has been running since 1844 when it was formed by George Williams in the churchyard at St. Pauls, London. This lengthy history should not be lost due to lack of awareness or a certain stigma that currently holds at the Chelmsford division.

The brief proposes we create an advertisement that will be posted to primary and secondary schools throughout the Chelmsford catchment area and viewed during assembly times. It must, therefore, be entertaining and accessible to all audiences from ages nine to sixteen. The brief must raise awareness of the variety of programs available at the YMCA and create a new image for the charity that encourages a more positive, cheerful and welcoming experience.

The modelling technique in 3D Studio Max is almost a foreign concept to me. Previously the only 3D modelling undertaken was the creation of a hidden enchanted room inside an old pub; which clearly uses very different modelling techniques to the formation of an organic creature such as the human form.
However, although this is going to be an extremely challenging project it also will allow a broadening of my current working knowledge of 3D Studios Max that will be hugely beneficial.

The first steps tutorial (cg-india.com\tutorials\3dsmax_tutorials_organic_modeling.html) giving guidance on how to make a head in 3D Max was incredibly useful. The first steps were to take side and front view photographs of ourselves and load them into Adobe Photoshop. Following the tutorial was a fairly simple exercise as the instructions were clear and the benefit to it being an online tutorial meant it could be paused and rewound as many times as necessary whilst the photographs were being manipulated in the first instance.